Document 10311205
advertisement

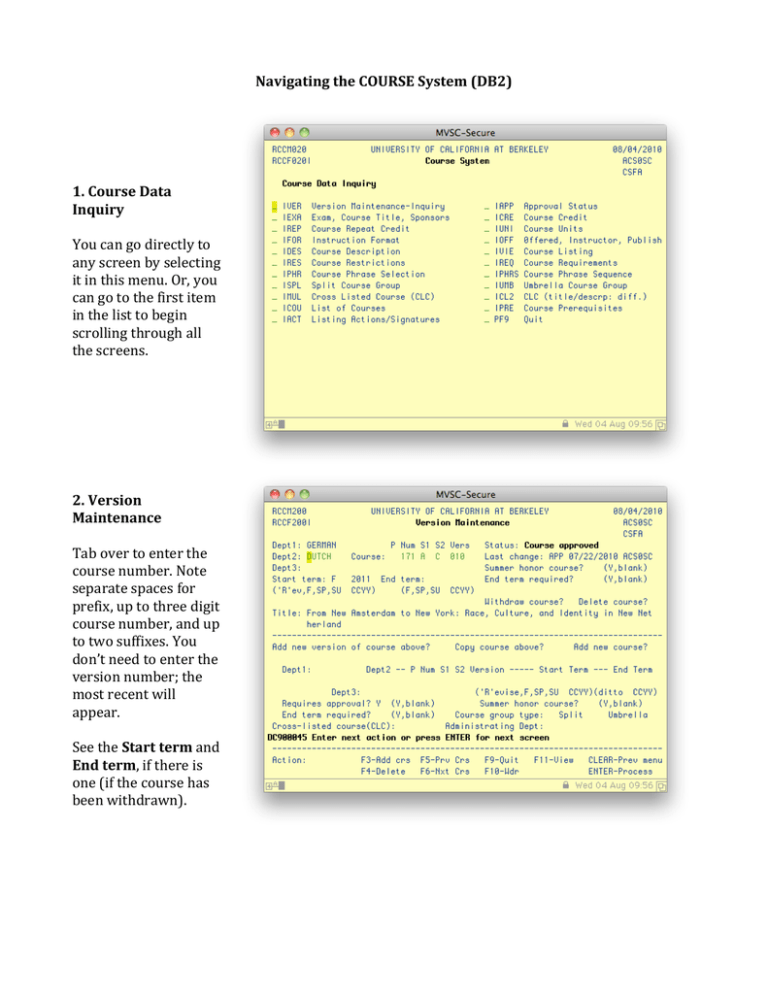
Navigating the COURSE System (DB2) 1. Course Data Inquiry You can go directly to any screen by selecting it in this menu. Or, you can go to the first item in the list to begin scrolling through all the screens. 2. Version Maintenance Tab over to enter the course number. Note separate spaces for prefix, up to three digit course number, and up to two suffixes. You don’t need to enter the version number; the most recent will appear. See the Start term and End term, if there is one (if the course has been withdrawn). 3. Exam, Course Title On this screen you can see the Transcript Title and the Catalog Title. In the middle is information about the final exam. If the course has been approved to hold a final exam during the regularly scheduled final exam period, there will be a Y after Final exam required? If the course has been approved without a final exam, there will be a blank. 4. Credit This screen shows whether the course is approved as Letter grading, Passed/not passed, etc. Note that if a course is approved as P/NP or S/U, students may only enroll with that credit option. If a course is approved with Letter grading, students may still choose to enroll P/NP or S/U. At the bottom of the screen is where you can find out whether the course is repeatable. 2 5. Units This screen shows the unit value. Most courses have a fixed unit value. Some courses are approved for Either (e.g., 3 or 4 units), and some for a range (e.g., 1-­‐4 units). 6. Offered, Instructor, Publish These are the three fields that can be changed without COCI approval, by sending an email to a COCI analyst. Note that if a course is approved for summer, it must be indicated. The instructor name can be indicated here. At the bottom is where data for Pruning is shown. 3 7. Instruction Format (Regular Term) This screen defaults to the regular (fall/spring) term. In the lower half of the screen you can see the list of format types along with their hours. At the bottom is the TIE code. 8. Instruction Format (Summer Term) If a summer term has been approved, you can see it on the same screen. Remove the Y from after the Regular? line, and put a Y after Summer? After you press return, a summer term will appear (same format types but different hours). If there is another summer term, you will see the term length listed under “(available weeks),” and you can see it by typing the number of weeks under the “locate” column. 4 9. Course Description This is where the Catalog description is entered. Note that what we consider to be the course description does not include anything else—no instruction format, prerequisites, etc. 10. Course Restrictions If there are any restrictions, they will be listed here. Restrictions should be indicated when the content of two courses overlaps so much that credit should be denied or limited for students who take both courses. 5 11. Course Prerequisites If there are any prerequisites for the course, they will be listed here. 12. University and Campus Requirements If a course is approved for any university or campus requirements, it will be indicated here. Note that L&S breadth requirements are not recorded in the COURSE system. L&S (not COCI) uses its own criteria to decide which courses meet the requirements. Contact L&S for more information. 6 13. Phrase Selection If a course has a special “phrase” attached, you would be able to see it here. For example, a prerequisite that is not a specific course but something like “at least one course in chemistry” would be entered as a “phrase.” Place the cursor in front of the Phrase type and press return. If a phrase has been entered, the Phrase sequence 20 (or higher) will appear. To see the current phrase, type a 10 over the 20 and press enter. 14. Course Listing – F11 The easiest way to see all of the course’s data in one place is to push F11 and go to the Course Listing screen. This shows how the course will appear in the Catalog. You can get to this screen by pushing F11 from any screen. To switch between regular and summer course data, type an “r” or “s” over the asterisk to the right of the course number. 7 15. List of Actions You can get to this screen by choosing it from the first menu, or by pressing return at the F11 screen. This shows where a course is in the review/approval process, and what changes have been made. The latest action should appear at the top of each of the other screens in COURSE. Unapproved course version created and anything after that: OR staff are working on data entry. Added by OR: OR has forwarded the course to the Academic Senate (or will soon). Awaiting Subcomm. Review: A COCI analyst has received the course. It is in the process of being reviwed. Course has been approved: The final step. 8


